Titanium dioxide photo electrodes for photo galvanic and photo electrochemical cells

1. Factual Informationen
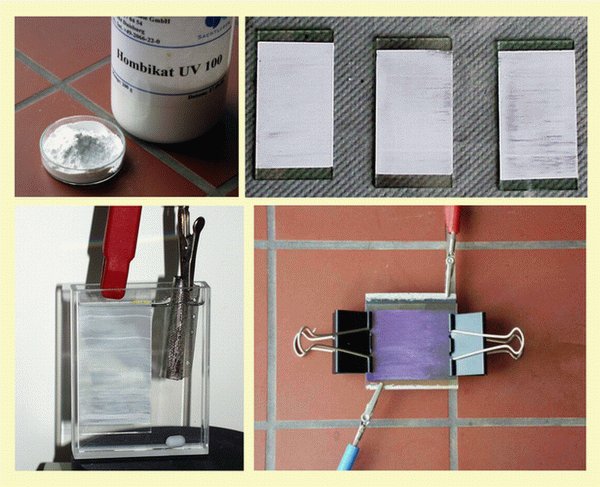
To prepare the photoelectrodes, the TiO2 powder (UV Hombikat 100) is first processed as a paste and applied to a conductive carrier layer - known as ITO glass. The use of coated glass results in translucent photoelectrodes which can be irradiated either directly from the TiO2 side or through the back of the glass. It is important to apply relatively thin TiO2 films, as the absorption of light quanta is only possible up to a certain coating thickness and the probability of recombination of electron-hole pairs increases with increased thickness.
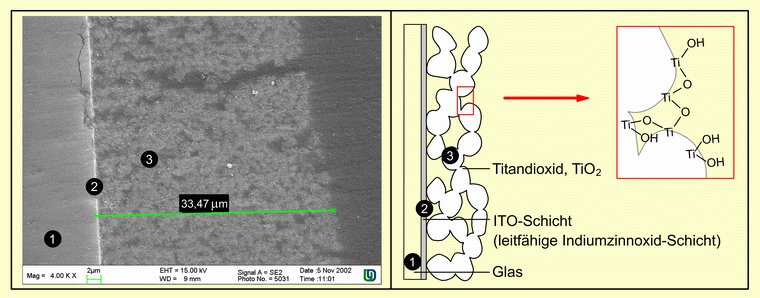
In the next step, the photoelectrodes are sintered at 400 °C - 450 °C. The yellow-brown coloration that often occurs when TiO2 is heated to 250 °C - 600 °C is due to a residual Fe2O3 content. It disappears once it has cooled down. During the sintering process, low resistance contacts are formed between the individual TiO2 particles, resulting in a continuous conduction path through the TiO2 film (cf. schematic structure of the photoelectrode in the figure below). This enables efficient charge transport in the semiconductor layer and to the ITO layer. The fact that only the core of the particles consists of pure titanium dioxide and that the surfaces are covered with OH groups has a beneficial effect. Thus, simple or peroxidic oxygen bridges can be formed between individual TiO2 grains during the sintering process by splitting off water and connecting the grains with each other. The sintering process of TiO2 in the anatase modification has not yet been intensively researched. However, it is known that at temperatures between 400 °C and 450 °C no changes occur in the lattice. Only at 500 °C does the rutile content increase by 5 %.
In the absence of light, sintered TiO2 exhibits an increased oxidation capacity compared to unsintered TiO2, which suggests the formation of peroxide oxygen bridges (cf. figure).

The composition of the self-made photoelectrodes can be examined by means of scanning electron microscope images (SEM images). The image of a TiO2 photoelectrode in cross-section (lower picture, left) gives an insight into the structure of the photoelectrode and the dimensions of the TiO2 layer. On the left is the carrier glass ➊ with the thin ITO layer (light thin layer ➋) and on the right the mesoporous TiO2 layer ➌. The average layer thickness of TiO2 is approx. 33 µm (marked green).
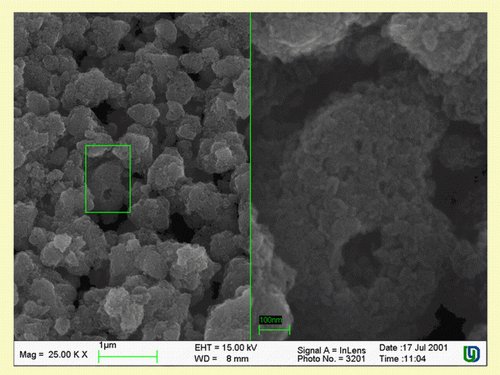
SEM images of the surfaces of sintered photoelectrodes with even higher magnification clearly show the mesoporous structure and the associated large surface area of the TiO2 layer. The individual TiO2 particles form agglomerates through which the electron transport can take place (see figure further down). SEM images of different photoelectrodes produced under the same conditions also show that the agglomeration of the photoelectrodes is not uniform.

2. Instructions for the preparation of titanium dioxide photoelectrodes and for their sensitization
(see commented pictures in the flash animation: photo electrochemical cell, sub section "The cell in a classroom experiment")
2.1 Preparation of titanium dioxide photoelectrodes
I.) Preparation of the TiO2 paste
A lump-free paste is prepared from 12 g titanium dioxide and 20 mL diluted nitric acid (pH = 3 - 4) by thoroughly mortaring TiO2 with the addition of HNO3(aq) in portions. This quantity is sufficient for approx. 30 glass sheets and lasts several months in a closed container.
II.) Coating of the conductive ITO glass1
First, the ITO glass is fixed with the conductive side up on a base (wooden plate or similar) by fixing it along two edges with a strip of tape each. With a glass rod, a strip of TiO2 paste is applied to one of the unglued edges. Afterwards, the TiO2 paste is quickly pulled over the ITO glass with a microscope slide so that a very thin but even layer is created.
1ITO glass: glass made conductive on one side with a thin layer of indium tin oxide. Other conductive glasses can also be used.
III.) Sintering of the titanium dioxide layer
If there is no oven (e.g. pottery oven), proceed as follows: The prepared TiO2 sheet is pushed into a bent metal sheet, which is attached to a tripod at a suitable height. Using a Bunsen burner underneath, dry the plates carefully (the glass can burst if heated too quickly) for 5 minutes to approx. 80 - 90 °C, continue heating for 5 minutes to approx. 250 °C and finally sinter for 10 minutes at 400 - 450 °C (the temperatures can be checked with a temperature sensor in the plate).
V.) Note
The photoelectrode used for the photogalvanic element can also do without ITO glass and use conventional thin glass plates. As described above, these are coated with a TiO2 layer and sintered. After sintering, the TiO2 layer is sprayed with graphite spray.
In the experiment, this "low-cost photoelectrode" is immersed in the electrolyte solution in such a way that the glass side of the lamp is closed and the graphite side is turned away from the lamp. When irradiated, the photoelectrons then drain off via the graphite layer.
2.2 Sensitization of photoelectrodes
I.) Extraction of dyes from raspberry juice (to sensitize the photoelectrode of the photoelectrochemical cell)
Fresh or frozen raspberries are thoroughly mortared and if necessary mixed with little distilled water or HCl(aq) (c = 2 mol/L) / methanol (1:4) as solvent. The extract is then filtered, poured into a dark bottle and can be stored in the refrigerator for several weeks for repeated use..
II.) Sensitization of the TiO2 electrode (photoelectrode of the photoelectrochemical cell)
The sintered, cooled TiO2 electrode is placed in raspberry juice for 3 - 5 minutes, carefully removed and dried with a weak air jet (hairdryer with cold air stage). The sensitized electrode is clearly colored and should be handled carefully, as the TiO2 layer can easily be damaged with the finger and wiped off.
